
Tile Fitting in a Bathroom Renovation: What Homeowners Should Know
What to expect from professional tile fitting during a bathroom renovation. Substrate prep, costs per m² and quality checks.
Why the Tiling Phase Matters More Than You Think

Choosing beautiful tiles is the exciting part. Getting them onto the walls and floors so they stay there for twenty years without cracking, lifting or letting water through is the part that actually determines whether your bathroom renovation succeeds or fails.
The tiling phase sits at the heart of any bathroom renovation. It happens after the plumber and electrician have finished their first-fix work and before the sanitaryware goes in. If the tiling is done well, everything that follows (fitting the basin, hanging the toilet, sealing the shower screen) falls into place. If the tiling is done poorly, problems emerge within months. Grout cracks. Tiles sound hollow when tapped. Water finds its way behind the surface and into the substrate. By the time visible damage appears, the cost of repair often exceeds the cost of the original tiling.
This guide is not about how to tile a bathroom yourself. It is about understanding the process well enough to manage it confidently, ask the right questions, prepare your bathroom properly, and recognise quality work when you see it. For the technical installation process itself, our professional tiling guide covers adhesive specifications, tanking systems, and BS 5385 compliance in detail.
What Happens Before a Single Tile Goes On
The quality of a tiled surface depends almost entirely on what happens before the first tile is pressed into adhesive. Professional tilers spend more time preparing the substrate than they do laying tiles, and for good reason.
Substrate Assessment
The substrate is the surface the tiles will be fixed to. In a bathroom renovation, this is typically one of four materials, each with different requirements.
Cement backer board (HardieBacker 500, Wedi, Marmox) is the gold standard for wet areas. It does not absorb water, does not swell, does not deform, and provides a rigid, flat surface that adhesive bonds to reliably. Professional bathroom fitters fix backer board to timber studs or battens with corrosion-resistant screws, taping and sealing all joints before tiling. For a detailed comparison of backer board types, see our guide on cement boards in bathrooms.
Moisture-resistant plasterboard (green board) is acceptable for areas of moderate splash exposure, but it is not suitable for direct shower zones without an additional tanking membrane. Standard plasterboard should never be used in wet areas. It absorbs water, swells, and eventually disintegrates behind the tiles.
Existing tiles can sometimes be tiled over, provided they are firmly bonded, level, and the combined weight does not exceed what the wall can support. The old tiles must be abraded or primed to create a key for the new adhesive.
Sand and cement render on masonry walls is common in older properties. Provided the render is sound, flat, and has been allowed to cure (a minimum of two weeks for new render), it makes an excellent substrate. Loose, hollow, or damp render must be hacked off and replaced before tiling begins.
Waterproofing
In shower enclosures, above baths, and in wet rooms, a tanking membrane must be applied before tiling. Tanking creates a continuous waterproof barrier between the tiled surface and the substrate. Without it, water migrates through grout joints (grout is water-resistant, not waterproof) and saturates the wall or floor behind.
Tanking systems come in two forms. Liquid-applied membranes (Mapei Mapelastic, BAL Tank-it, Weber Tec Superflex D2) are painted onto the substrate in two coats, with reinforcing tape bedded into corners and junctions. Sheet membranes (Schluter DITRA, Wedi subliner) are bonded to the substrate and overlapped at joints. Both systems work when installed correctly. The choice between them usually comes down to the tiler’s preference and the substrate type.
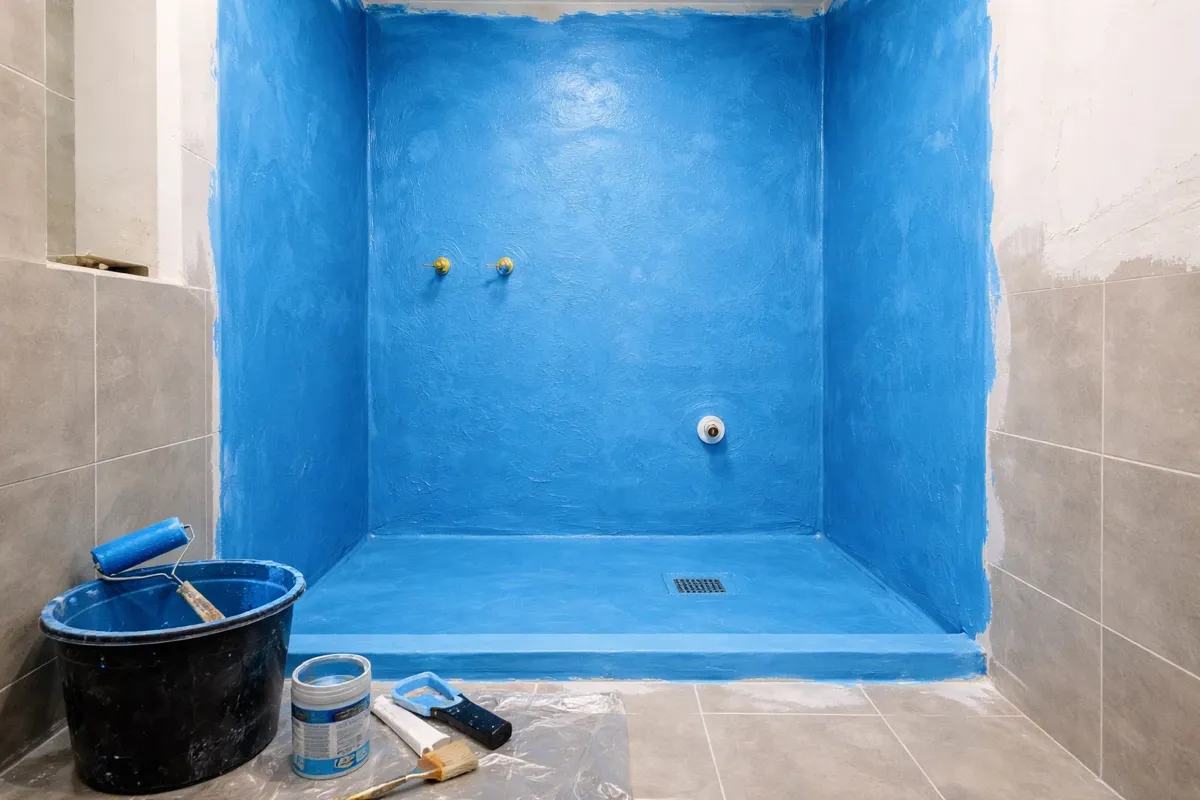
A homeowner should always ask whether the shower area will be tanked, and if so, which system will be used. Skipping this step is one of the most common causes of long-term water damage in bathrooms.
Levelling
Tiles do not hide an uneven surface. They amplify it. A bump in the substrate becomes a visible lippage line between tiles. A dip becomes a pooling point for water on the floor.
On walls, deviations are corrected with a skim coat of levelling compound or by packing out battens behind backer board. On floors, self-levelling compound (SLC) is poured to create a flat, even surface before tiling begins. Floor screeds must be dry (less than 75 per cent relative humidity for cementitious adhesives) and primed before SLC is applied.
What to Discuss With Your Tiler Before Work Starts

A ten-minute conversation before the first tile is laid prevents misunderstandings that are expensive to fix later. These are the key points to agree.
Layout and starting point. Where will the first tile go? A professional tiler dry-lays the first row and plans the layout so that cut tiles at the edges are symmetrical and no cut piece is narrower than half a tile width. Thin slivers at the edges of a wall or floor are the hallmark of rushed work.
Tile orientation and pattern. Running bond (brickwork pattern), straight stack, herringbone, and diagonal layouts each create a different look. The pattern must be agreed before tiling starts because it affects tile quantities and waste percentages. Straight stacking produces roughly 5 per cent waste. Herringbone and diagonal layouts produce 10 to 15 per cent. For a comprehensive overview of layout options, see our guide on tiling styles.
Grout colour and width. Grout colour has a dramatic effect on the finished appearance. A contrasting grout (white grout with dark tiles) highlights the tile pattern. A matching grout creates a seamless, unified surface. Grout joint width depends on the tile type. Rectified porcelain tiles can be laid with 1.5 to 2mm joints. Non-rectified ceramic tiles need 3 to 5mm joints to accommodate size variation between tiles.
Trim and edge detail. Where tiles meet an unfinished edge (window reveals, external corners, niches), the options are mitred edges, metal or PVC trim strips, or Schluter profiles. Metal trims in brushed stainless or chrome give a clean contemporary finish. Mitred edges look seamless but require precise cutting. Agree the approach before tiling, because retrofitting trim after the adhesive has cured is difficult.
Movement joints. All tiled areas need movement joints at perimeter edges (where tiles meet a different surface) and at regular intervals on large floor areas. These joints accommodate thermal expansion and structural movement. They are typically filled with silicone sealant rather than grout. BS 5385 recommends perimeter joints of at least 3mm and intermediate movement joints at 3 to 4.5 metre intervals on floors.
Adhesive and Grout: The Basics a Homeowner Needs
You do not need to become an adhesive chemist, but understanding the fundamentals helps you evaluate what your tiler is doing and why.
Adhesive types. Cementitious adhesives (powder mixed with water) are the standard for most bathroom tiling. They come in flexible (S1) and highly flexible (S2) grades. S1 is suitable for most wall and floor applications. S2 is required on substrates that move or flex, such as plywood floors, underfloor heating systems, and timber-framed walls. Ready-mixed adhesives (tubs) are convenient for small areas but are not suitable for floors, wet areas, or porcelain tiles because they cure by evaporation and cannot dry through non-porous tiles.
Grout types. Cementitious grout is the standard choice. Epoxy grout is more expensive but impervious to water, staining, and mould. It is particularly suitable for shower floors and splashback areas. Epoxy is harder to apply and less forgiving of poor technique, so not every tiler works with it.
Coverage. Adhesive must cover the full back of every tile. The “dot and dab” method (applying blobs of adhesive at five points on the tile back) is not acceptable in wet areas. It leaves voids behind the tile where water collects, causing mould growth and eventual tile failure. Full-bed adhesive application, ideally with a notched trowel on both the substrate and the tile back (back-buttering), ensures no voids.
How Much Does Professional Tile Fitting Cost?
Tiling costs vary depending on tile size, pattern complexity, substrate preparation, and regional labour rates. The figures below reflect the Greater Manchester area for professional fitting by an experienced tiler.
| Work Type | Labour Cost (per m²) | Including Materials (per m²) |
|---|---|---|
| Standard wall tiling (ceramic, straight stack) | £25 – £35 | £55 – £80 |
| Standard floor tiling (porcelain, straight stack) | £30 – £40 | £65 – £95 |
| Complex patterns (herringbone, chevron) | £40 – £55 | £75 – £120 |
| Mosaic sheets | £45 – £60 | £80 – £130 |
| Natural stone (marble, slate, travertine) | £40 – £55 | £90 – £180 |
Tiler day rates in the region typically run between £180 and £250 per day. An experienced tiler working with standard format tiles (300 x 600mm or larger) on a well-prepared substrate can cover 8 to 12 m² of wall or 10 to 15 m² of floor per day. Smaller tiles, intricate patterns, and awkward spaces reduce productivity significantly.
These figures cover labour and standard materials (adhesive, grout, trims). The tiles themselves are a separate cost. For guidance on choosing tiles and calculating quantities, see our tile buying and planning guide. For a full breakdown of bathroom renovation costs including all trades, see our bathroom cost guide.
When Professional Fitting Is Essential
Some tiling jobs can be tackled by a confident homeowner with the right tools and preparation. A simple kitchen splashback on a flat plastered wall, for example, is manageable with patience and a tile cutter. Bathroom tiling, however, involves complications that make professional fitting strongly advisable.
Waterproofing responsibility. A failed tanking membrane leads to structural damage. Professional tilers carry insurance that covers the cost of stripping and re-tiling if a waterproofing failure occurs. A homeowner who tanks and tiles their own shower has no such protection.
Weight calculations. Large-format porcelain tiles (600 x 1200mm) weigh 20 to 25 kg per square metre. Natural stone tiles weigh 25 to 40 kg per m². Wall substrates must be capable of supporting this load over the long term. A professional tiler assesses the substrate before starting and will specify backer board or additional support where needed.
Electrical zone compliance. Tiling around electrical fittings in bathroom zones (defined in BS 7671) requires the tile cuts and sealant details to maintain the IP rating of the fitting. An extractor fan rated IP65 loses its ingress protection if the tile surround is not sealed correctly.
Floor drainage falls. In wet rooms and walk-in showers, the floor must fall towards the drain at a consistent gradient (typically 1:80 to 1:60). Achieving this with tiles requires precise substrate preparation and tile cutting. It is the single most technically demanding aspect of domestic tiling work.
Heated floors. Tiling over underfloor heating requires S2-rated flexible adhesive, careful cable routing to avoid damage, and specific curing protocols. Switching the heating on too early can weaken the adhesive bond permanently.
How to Check the Quality of Finished Tiling

You do not need trade expertise to assess a tiling job. The following checks can be done during and immediately after installation, ideally before the grout fully cures (within the first 24 hours).
Flat surface. Hold a straight edge (a spirit level works well) against the tiled wall or floor. There should be no visible gaps between the straight edge and the tile surface. BS 5385 permits a maximum deviation of 3mm over a 2-metre straightedge for wall tiles and 3mm over 3 metres for floor tiles. Anything beyond that indicates poor substrate preparation or inconsistent adhesive application.
Consistent grout lines. Grout joints should be even in width and straight. Slight variation is normal with non-rectified tiles, but wavy, pinched, or significantly uneven grout lines indicate tiles were not properly spaced during installation.
No lippage. Run your fingers across adjacent tiles. The edges should be flush. A noticeable step (lippage) between tiles of more than 1mm on walls or 2mm on floors is considered a defect. Tile levelling clips, which professional tilers routinely use, prevent lippage during installation.
Solid bond. Tap tiles gently with a knuckle. A solid tile produces a dull, muted sound. A hollow sound indicates a void behind the tile where adhesive did not make contact. Hollow tiles in wet areas are a particular concern because water will collect in the void, leading to mould and eventual tile failure.
Clean grout finish. Grout should fill the joint completely and be finished flush with or very slightly below the tile surface. Grout smears on the tile face, pin-holes in the grout line, or gaps where grout is missing entirely all indicate rushed finishing.
Sealed perimeter joints. Where tiles meet a bath, shower tray, basin, or a change of surface, the junction should be sealed with flexible silicone sealant, not grout. Grout at these junctions will crack as the surfaces move independently. The silicone should be applied neatly in a continuous bead with no gaps.
The Tiling Phase in the Renovation Sequence
Tiling does not happen in isolation. It sits within a defined sequence of trades, and getting the timing right prevents costly rework.
The plumber and electrician complete their first-fix work first, running all pipework and cabling to their final positions and leaving everything capped or terminated. The substrate is then prepared (backer board fixed, tanking applied, floors levelled). Only when the substrate is ready does the tiler begin.
Walls are tiled before floors. This prevents adhesive and grout droppings from damaging finished floor tiles, and allows the wall tiles to sit on top of the floor tiles at the base, creating a cleaner junction. The exception is wet room floors, where the floor membrane and tiles may be completed first to allow the wall tanking to overlap the floor system.
After tiling, the room must cure for a minimum of 24 hours (48 hours for floors subject to foot traffic) before the plumber returns for second fix. Rushing this stage risks disturbing tiles before the adhesive has reached full strength. For a detailed look at the full renovation trade sequence, see our bathroom renovation guide.
The shower renovation challenges article covers additional tiling complications specific to shower enclosures, including mixed substrates and recessed niches.
Frequently Asked Questions
How long does the tiling phase take in a bathroom renovation?
Should I buy the tiles or will the tiler supply them?
What is the difference between rectified and non-rectified tiles?
Can new tiles be laid over existing tiles?
How much waste should I allow when ordering tiles?
What should I do if I notice a problem with the tiling after it is finished?
Is underfloor heating compatible with all tile types?
How do I find a good tiler?
Past Projects


Get a Free Quote
Book a free, no-obligation site survey. Call us on +44 7428 653 653 or request a callback.
Book Free SurveyOur Clients' Reviews

5/5

5/5

5/5

5/5
Based on 453+ verified reviews across all platforms
Related Articles

Hiring Bathroom Fitters in Manchester: Costs, Process and Advice
What Manchester Homeowners Need to Know Before Hiring Renovating a bathroom is one of the most rewarding home improvements you can make, and one of the easiest to get wrong if you hire the wrong people.
view this article Read more
The Art of Bathroom Tiling: A Professional Installation Guide
How Professional Bathroom Tiling Actually Works Beautiful bathroom tiles start long before the first tile touches the wall. The visible result — clean lines, flush surfaces, watertight joints — depends on a sequence of preparation steps that most homeowners never see.
view this article Read more
How Much Does a New Bathroom Cost in 2026? UK Pricing Guide
What a New Bathroom Really Costs in 2026 The question every homeowner asks before a bathroom renovation is the same. How much?
view this article Read more
Bathroom Renovation Guide: Every Stage From Start to Finish
What a Bathroom Renovation Actually Involves A complete bathroom renovation is one of the most rewarding home improvement projects you can undertake, but it is also one of the most misunderstood.
view this article Read more
Bathroom Tiling Styles for Timeless Elegance
Why Layout Matters More Than the Tile Itself A bathroom tile is a raw ingredient. The layout pattern is the recipe.
view this article Read more
Quartz, Granite or Porcelain Worktops: Which Suits Your Kitchen?
The Three-Way Decision Most Kitchen Renovations Come Down To Once you have decided that laminate is not enough and solid wood is not right for your cooking habits, the conversation narrows quickly.
view this article Read more
Ceramic Disc Technology in Bathroom Taps: How It Works
The Technology Inside Almost Every Modern Tap If your bathroom taps turn with a smooth quarter-turn rather than two and a half rotations, they contain ceramic disc cartridges.
view this article Read more
Fitting Kitchen Worktops: The Complete Installation Guide
From Order to Fitted The worktop is one of the last things fitted in a kitchen renovation and one of the first things to go wrong if the process is rushed.
view this article Read more
How to Choose an Electrical Bathroom Mirror
What an Electrical Bathroom Mirror Actually Does An electrical bathroom mirror is a permanently wired fixture that combines a mirror with integrated LED lighting, and often a demister pad, Bluetooth speakers, a shaver socket, or adjustable colour temperature.
view this article Read more
Best Bathroom and Toilet Brands in the UK
What Makes a Good Bathroom Brand The brand name on your toilet, basin or shower valve determines far more than the price tag.
view this article Read more
Bathroom Underfloor Heating: Types, Installation and What to Expect
Why Underfloor Heating Works So Well in Bathrooms Stepping onto a warm bathroom floor on a cold January morning is one of those small luxuries that, once experienced, becomes very difficult to give up.
view this article Read more
Tools Required for Bathroom Fitting: The Professional Trade Toolkit
The Professional Bathroom Fitter’s Complete Toolkit Every professional bathroom fitter knows that quality tools are an investment, not an expense. The difference between a flawless installation and a problematic one often comes down to having the right equipment for the job.
view this article Read more