
Damp Proofing with Membrane for Plasterboard: The Complete UK Guide
How to damp proof walls with studded membrane and plasterboard. Membrane types, installation steps, UK costs and common mistakes explained.
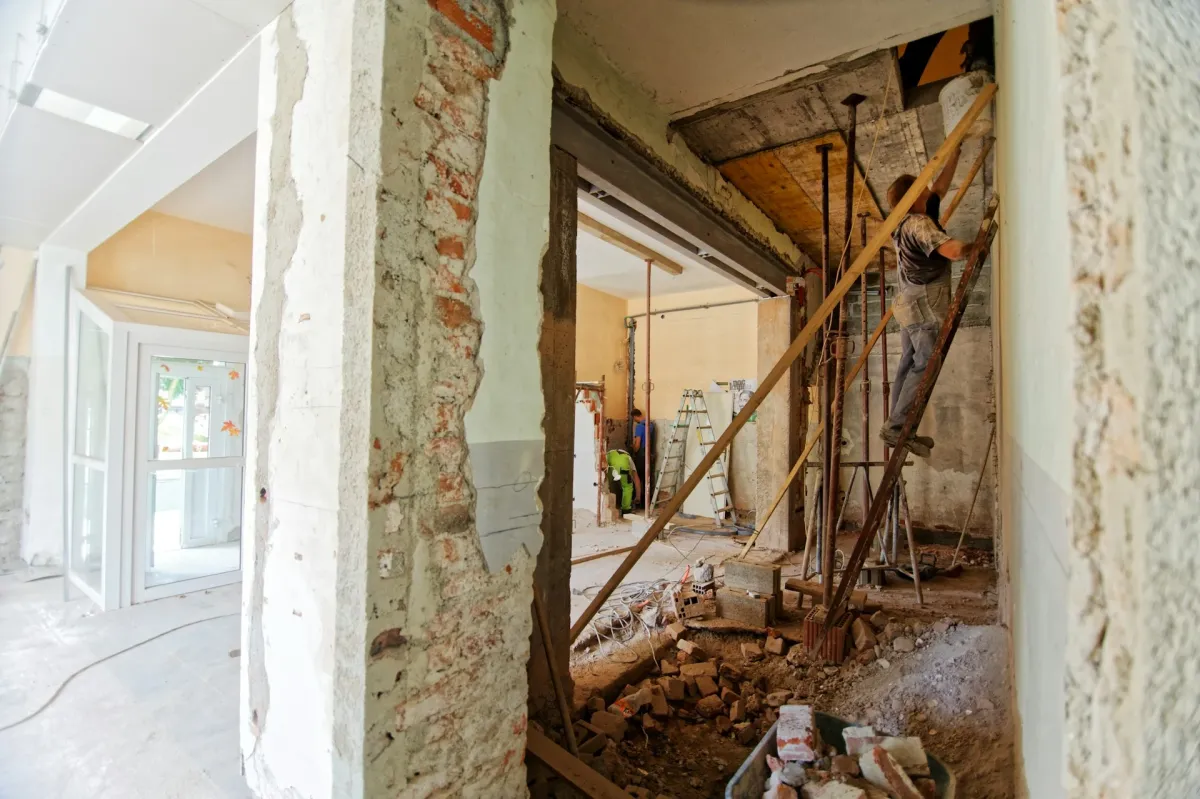
Why Plastering Over Damp Never Works
Every damp proofing specialist in the UK has walked into a property where the previous owner or builder plastered directly over a damp wall and hoped for the best. The plaster absorbs moisture from the masonry behind it. Hygroscopic salts migrate through and crystallise on the surface, pushing paint and wallpaper off within months. The cycle of replastering and redecorating repeats until someone addresses the root cause and installs a proper barrier between the damp masonry and the finished wall.

That barrier is a damp proof membrane. When installed correctly between the masonry and the plasterboard, it intercepts moisture before it reaches the internal finish, manages it within a controlled air gap, and delivers a dry, stable surface that stays dry for decades. This guide covers how to diagnose the damp type, which membrane to use, how to install it properly, what it costs in the UK, and the mistakes that guarantee failure. If you suspect damp in your property, our damp proofing team can survey and diagnose before any work begins.
Three Types of Damp and How to Tell Them Apart
Installing a membrane without diagnosing the damp type is like taking painkillers without knowing what hurts. The membrane manages moisture at the wall surface, but the source must be identified and addressed first. The UK has three distinct damp types, and each requires a different approach.
Rising Damp
Groundwater drawn upwards through porous masonry by capillary action. It affects walls where the original damp proof course has failed, been bridged by raised external ground levels, or was never installed. Pre-1875 properties commonly have no DPC at all.
The diagnostic signs are specific. A visible horizontal tide mark on internal walls, typically reaching no higher than 1.0 to 1.5 metres above floor level, marks the point where gravity and evaporation overcome the capillary pull. White crystalline salt deposits appear along the affected zone as dissolved chlorides and nitrates in the groundwater evaporate and crystallise at the wall surface. These salts are hygroscopic, meaning they attract further moisture from the air and perpetuate the damp cycle even after the original water source is addressed. Plaster bubbles, crumbles and blows away from the masonry behind it. Unlike condensation, rising damp rarely produces significant mould because the salts inhibit fungal growth.
Penetrating Damp
Rainwater entering through the building envelope. It can appear at any height and on any wall, not just at ground level. The common UK causes are defective pointing (particularly on west-facing walls that receive the prevailing rain), cracked or blown render, failed flashings around chimneys and roof abutments, blocked or overflowing gutters saturating the wall below, and debris bridging the cavity in cavity wall construction.
Penetrating damp does not leave hygroscopic salt deposits. It appears as irregular damp patches that worsen during or immediately after rainfall and often have a clearly defined perimeter corresponding to the external defect. Fix the external fault first. A membrane treats the symptom. A £50 gutter repair or £200 repointing job treats the cause.
Condensation
The most common damp problem in UK homes according to the Building Research Establishment. It occurs when warm moisture-laden air meets a surface below its dew point temperature. Normal living generates substantial moisture through cooking, bathing, breathing and drying clothes indoors. When ventilation is inadequate, single glazing creates cold surfaces, or cold bridging through steel lintels and uninsulated reveals provides localised cold spots, condensation forms.
The signs are black mould growth (especially in corners, behind furniture and around window reveals), streaming windows in the morning, and a persistent musty smell. Condensation is worst in winter and appears on or near cold surfaces. A membrane alone will not resolve condensation. Improved ventilation and insulation must be part of the solution.
Quick Diagnostic Guide
| Feature | Rising Damp | Penetrating Damp | Condensation |
|---|---|---|---|
| Location | Ground floor, base of walls | Anywhere | Cold surfaces, corners |
| Height limit | Up to 1.0-1.5m | None | None |
| Salt deposits | Yes (white crystalline) | No | No |
| Tide mark | Yes (horizontal) | No | No |
| Mould | Rarely | Sometimes | Frequently |
| Seasonal pattern | Year-round | Worse after rain | Worse in cold months |
Membrane Types for Wall Damp Proofing
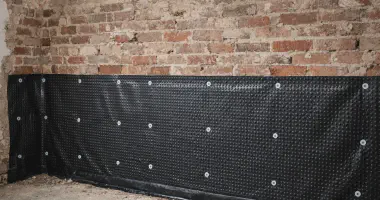
Studded Cavity Drain Membrane
The primary solution for damp-proofing internal walls in the UK. A polypropylene or HDPE sheet with raised studs on one face is fixed to the masonry with the studs facing the wall. This creates a small air gap (2mm to 8mm depending on stud height) between the membrane and the damp masonry. Moisture migrating through the wall is intercepted by the membrane and either evaporates within the cavity or drains downward under gravity.
The main UK products and their specifications:
Platon PB2 (manufactured by Isola, distributed by Triton and Permagard) has a 2mm stud height, polypropylene construction, BBA certification, and a life expectancy of at least 50 years. Available as a mesh-faced variant for direct plastering or dot-and-dab plasterboard. A 20m² kit with fixings costs around £90 to £200.
Newton 803 Newtonite uses HDPE with a 3mm stud height, BBA Certificate 94/3010, and a 30-year guarantee against deterioration. Available in meshed and non-meshed variants. A 20m² kit costs around £189. Newton is the most widely specified membrane brand for professional damp proofing work in the UK.
Oldroyd Xv and Xs from Safeguard Europe are BBA-approved polypropylene membranes. Oldroyd Xv costs approximately £4.50 to £5.50 per square metre. Oldroyd Xs uses a slimline profile at a similar price point.
Wykamol CM3 has a 3mm stud height in HDPE with trade pricing from around £3.50 per square metre including VAT. Their CM8 variant with 8mm studs suits more severe damp or below-ground applications.
Liquid Applied DPM
Brush-on or spray-on liquid membranes from Wykamol (Technoseal), Safeguard (Drybase) and Sovereign (DrySure) cost £25 to £45 per 5-litre tin. They are useful for floor-to-wall junctions and as a supplementary measure, but they do not provide the air gap that makes studded membranes effective at managing ongoing moisture. For significant wall damp, a liquid DPM alone is not enough.
Self-Adhesive Bituminous Membrane
Products like Visqueen Self Adhesive Membrane (SAM) provide a fully bonded, impervious barrier compliant with BS 8102 Type A waterproofing. These are primarily used for below-ground tanking and retaining walls rather than routine above-ground wall damp proofing. Lapped joints require a minimum 150mm overlap.
The Plasterboard-Over-Membrane System
The complete system works in layers. The studded membrane is fixed to the masonry with sealed plaster plugs at approximately 15 fixings per square metre. Pressure-treated timber battens (typically 25mm by 50mm) are fixed vertically through the membrane into the masonry at 400mm to 600mm centres. Plasterboard is screwed to the battens, then skimmed with finishing plaster and decorated.
Where a mesh-faced membrane is used, plasterboard can alternatively be bonded directly to the membrane using dot-and-dab adhesive covering at least 50 percent of the membrane surface. Mesh-faced membranes can also be plastered directly with a minimum 15mm total depth applied in three coats.
The air gap between the membrane and the masonry is critical and must be sealed, not ventilated. An actively ventilated cavity would draw warm moist room air into the cold space behind the membrane, causing condensation within the cavity itself. The sealed gap allows moisture from the masonry to evaporate or drain harmlessly while preventing room air from interfering with the process. However, the room itself must have adequate ventilation. Installing membrane over large wall areas reduces the building’s natural moisture buffering capacity, and without proper extraction fans and trickle vents, condensation in the living space can actually worsen after treatment.
Plasterboard Options
Standard plasterboard is adequate when using mesh-faced membrane with dot-and-dab, as the plasterboard sits tight against the membrane with minimal cavity on the room side.
Foil-backed plasterboard has an aluminium foil layer on the reverse that acts as a vapour barrier. It limits moisture from the warm room side migrating into the cavity behind, and is the recommended choice when battening out over a membrane. Joints must be sealed with foil tape to maintain the barrier. Costs £8 to £12 per sheet versus £5 to £8 for standard board.
Insulated plasterboard from Kingspan (Kooltherm K118), Gyproc (Thermaline) or Celotex combines plasterboard with rigid insulation. When installed over a damp proof membrane on battens, it addresses both damp and cold bridging simultaneously, tackling two of the three damp causes in one system. Costs £20 to £50 per sheet depending on insulation thickness.
Step-by-Step Installation
Preparation
Remove all blown, damaged or salt-contaminated plaster back to bare masonry. Salt-contaminated plaster will continue to attract moisture even behind a membrane. Hack off any loose or hollow-sounding render. Remove old wallpaper, adhesive residue, nails and protrusions that could puncture the membrane. Treat any visible mould with a fungicidal wash such as Barrettine Mould Solution or Wykamol Biocidal Wash, and allow the wall to dry before proceeding.
For rising damp, the source should be addressed before or alongside the membrane installation. Chemical DPC injection using products like Safeguard Dryzone cream (BBA certified, approximately £15 to £20 per 310ml cartridge) creates a new damp proof course within the masonry. The membrane then manages residual moisture and salt contamination above the new DPC.
Fixing the Membrane
Start at one end of the wall with the studs facing the masonry. The membrane should extend from floor level to the ceiling for comprehensive protection. Using an SDS drill with a 7mm or 8mm masonry bit, drill through the membrane into the masonry and fix with the manufacturer’s sealed plaster plugs at approximately 15 fixings per square metre. Work from top down, pulling the membrane taut and square as you go.
Where membrane sheets meet, overlap by a minimum of 100mm and seal with the manufacturer’s mastic. At floor level, lap the membrane onto the floor DPM (if one exists) with a minimum 100mm overlap, sealed with mastic. This continuity is essential. If the wall membrane is not connected to the floor DPM, moisture bypasses the wall barrier at floor level and rises behind the new plasterboard through the gap. At the top, seal the membrane to the ceiling with a continuous bead of mastic.
Around pipes, cables and switches, cut the membrane carefully and seal around each protrusion. No gap should bridge damp masonry to the new finish.
Battening and Boarding
Fix pressure-treated vertical battens at 400mm to 600mm centres using appropriate-length masonry screws through the membrane. Add horizontal battens at the top and bottom for plasterboard edges. Screw plasterboard to the battens at 150mm centres along edges and 300mm centres in the field. Tape and fill joints with jointing compound, then skim with finishing plaster (typically Thistle Multi-Finish at 2 to 3mm thickness). Allow the skim to dry fully before decorating, which takes two to four weeks in normal conditions.
What It Costs in the UK
Materials Only (DIY)
| Item | Cost |
|---|---|
| Studded membrane, 20m² kit with fixings | £90-£200 |
| Sealing mastic per cartridge | £8-£15 |
| Chemical DPC cream (Dryzone 310ml) | £15-£20 |
| Pressure-treated battens (25x50mm, per 2.4m length) | £2-£4 |
| Standard plasterboard per sheet | £5-£8 |
| Foil-backed plasterboard per sheet | £8-£12 |
| Fungicidal wash (5 litres) | £10-£20 |
| Total for one room (approx. 20m² wall area) | £250-£500 |
Professional Installation
| Treatment | Typical Cost |
|---|---|
| Damp survey | £150-£350 |
| Chemical DPC injection (terraced house) | £350-£450 |
| Chemical DPC injection (semi-detached) | £650-£950 |
| Membrane installation per m² | £70-£135 |
| Full membrane treatment (average semi-detached) | £4,000 |
| Replastering after treatment (per room) | £450-£800 |
The Cost of Not Treating
Untreated damp is not just a decorating nuisance. Surface damp issues reduce property value by approximately 5 percent. Visible rising or penetrating damp drops valuations by 10 to 20 percent. Extensive structural damage from prolonged untreated damp reduces property value by 25 to 53 percent, with affected properties sitting on the market twice as long as comparable dry homes. Mortgage lenders may withhold funds or refuse lending entirely on properties with unresolved damp problems.
Common Mistakes That Guarantee Failure
Plastering directly over damp masonry without a membrane. Standard gypsum plaster absorbs moisture and salts, blows within months, and creates a cycle of repeated redecoration that never solves the problem.
Not diagnosing the damp type before installing a membrane. A membrane addresses moisture at the wall surface but not its source. If the cause is a blocked gutter or failed flashing, the membrane is an expensive sticking plaster when a simple external repair would suffice.
Leaving timber behind the membrane. Old lintels, fixing plugs, skirting boards and stair components left behind the membrane are effectively wrapped in plastic against damp masonry. The timber’s moisture content rises to dangerous levels, creating ideal conditions for dry rot. All timber must be removed or treated with preservative and isolated from the masonry before the membrane is installed.
Not connecting the wall membrane to the floor DPM. Without a minimum 100mm sealed overlap at floor level, moisture bypasses the wall barrier and rises behind the new plasterboard through the gap at the base.
Not extending the membrane far enough. For rising damp, the membrane should extend well above the tide mark, ideally to the ceiling. Stopping at the exact edge of the visible damp means moisture can bypass it and affect the untreated area above.
Neglecting room ventilation after installation. Covering large wall areas with membrane reduces the building’s natural moisture buffering. Without adequate extraction fans, trickle vents or mechanical ventilation, condensation can worsen after treatment.
Health Risks and Legal Obligations
Damp is not just a property issue. UK Health Security Agency research estimates that between 962,000 and 6.5 million English households are affected by damp or mould. In 2019, damp and mould exposure was associated with approximately 5,000 new asthma cases and 8,500 lower respiratory infections among children and adults. Black mould (Stachybotrys chartarum) produces mycotoxins that are especially dangerous for asthmatics, infants, older adults and immunocompromised individuals.
Under the Housing Act 2004, damp and mould constitute a Category 1 hazard under the Housing Health and Safety Rating System, triggering mandatory enforcement action by local authorities. The Homes (Fitness for Human Habitation) Act 2018 allows tenants to take landlords to court directly over damp issues. Awaab’s Law, named after two-year-old Awaab Ishak who died in 2020 from respiratory conditions caused by prolonged mould exposure in social housing, now requires social landlords to investigate damp and mould within 10 working days and make it safe within 5 working days of investigation.
For homeowners, the health argument for treating damp is as compelling as the financial one. For landlords, it is now a legal obligation with enforceable timescales.
When to Call a Professional
DIY membrane installation is realistic for a competent homeowner tackling one or two walls in a clearly diagnosed situation above ground level. The materials are straightforward and widely available from Permagard, Platinum Chemicals and other specialist suppliers.
Call a professional when you cannot confidently diagnose the damp type, when multiple damp types are present, when structural timbers are at risk, when the property is a listed building, or when below-ground waterproofing is needed. Basement and cellar conversions require professional design and installation to BS 8102 and almost always need Building Regulations approval.
Look for a surveyor with CSRT (Certificated Surveyor in Remedial Treatments) or CSSW (Certificated Surveyor in Structural Waterproofing) qualifications, ideally a member of the Property Care Association (PCA). PCA members offer insurance-backed guarantees of 20 to 30 years that transfer to subsequent property owners. If a PCA member company ceases trading, the PCA covers the work and progresses it to completion. This consumer protection is a significant advantage over using unaccredited tradespeople, particularly for work that affects mortgage valuations. For a home renovation that includes damp proofing, our team works with PCA-certified surveyors to ensure the treatment is properly specified and guaranteed.
Frequently Asked Questions
Can I plasterboard directly onto a damp wall?
What is the difference between a studded membrane and a liquid DPM?
How much does professional damp proofing cost in the UK?
Should the cavity behind a damp proof membrane be ventilated?
How long does a damp proof membrane last?
Do I need Building Regulations approval for damp proofing?
What qualifications should a damp proofing surveyor have?
Past Projects


Get a Free Quote
Book a free, no-obligation site survey. Call us on +44 7428 653 653 or request a callback.
Book Free SurveyOur Clients' Reviews

5/5

5/5

5/5

5/5
Based on 453+ verified reviews across all platforms
Related Articles
Damp Proofing Old UK Houses: Causes, Treatments and What Works
Why Old Houses and Damp Are a Different Problem Entirely The English Housing Survey puts the number of dwellings in England with a damp problem at 1.
view this article Read more
How Much Does a New Bathroom Cost in 2026? UK Pricing Guide
What a New Bathroom Really Costs in 2026 The question every homeowner asks before a bathroom renovation is the same. How much?
view this article Read more
Bathroom Renovation Guide: Every Stage From Start to Finish
What a Bathroom Renovation Actually Involves A complete bathroom renovation is one of the most rewarding home improvement projects you can undertake, but it is also one of the most misunderstood.
view this article Read more
Bathroom Tiling Styles for Timeless Elegance
Why Layout Matters More Than the Tile Itself A bathroom tile is a raw ingredient. The layout pattern is the recipe.
view this article Read more
Quartz, Granite or Porcelain Worktops: Which Suits Your Kitchen?
The Three-Way Decision Most Kitchen Renovations Come Down To Once you have decided that laminate is not enough and solid wood is not right for your cooking habits, the conversation narrows quickly.
view this article Read more
Ceramic Disc Technology in Bathroom Taps: How It Works
The Technology Inside Almost Every Modern Tap If your bathroom taps turn with a smooth quarter-turn rather than two and a half rotations, they contain ceramic disc cartridges.
view this article Read more
Fitting Kitchen Worktops: The Complete Installation Guide
From Order to Fitted The worktop is one of the last things fitted in a kitchen renovation and one of the first things to go wrong if the process is rushed.
view this article Read more
How to Choose an Electrical Bathroom Mirror
What an Electrical Bathroom Mirror Actually Does An electrical bathroom mirror is a permanently wired fixture that combines a mirror with integrated LED lighting, and often a demister pad, Bluetooth speakers, a shaver socket, or adjustable colour temperature.
view this article Read more
Best Bathroom and Toilet Brands in the UK
What Makes a Good Bathroom Brand The brand name on your toilet, basin or shower valve determines far more than the price tag.
view this article Read more
Bathroom Underfloor Heating: Types, Installation and What to Expect
Why Underfloor Heating Works So Well in Bathrooms Stepping onto a warm bathroom floor on a cold January morning is one of those small luxuries that, once experienced, becomes very difficult to give up.
view this article Read more
Tools Required for Bathroom Fitting: The Professional Trade Toolkit
The Professional Bathroom Fitter’s Complete Toolkit Every professional bathroom fitter knows that quality tools are an investment, not an expense. The difference between a flawless installation and a problematic one often comes down to having the right equipment for the job.
view this article Read more
What You Need to Know Before Your Kitchen Renovation
The Gap Between Expectation and Reality A kitchen renovation is not a weekend project. The 2025 Houzz UK Kitchen Trends Study found that 71 percent of homeowners change their kitchen layout during a renovation, and the median spend rose 34 percent year on year to £17,500.
view this article Read more