Best Screws for Bathroom Fittings: Fixings Guide by Wall Type and Load
Complete guide to bathroom screws and fixings. Stainless steel grades, wall plugs by substrate, load ratings per fixture and tile drilling techniques.
Why Screw Choice Matters More in Bathrooms
A bathroom is the most hostile environment for metal fasteners in any home. Constant humidity, direct water contact, steam, and regular exposure to cleaning chemicals create conditions that will corrode the wrong screw within weeks. Choose correctly and your towel rail stays firmly on the wall for a decade. Choose badly and you get rust stains bleeding through your grout, fixtures pulling away from the wall, and a repair bill that dwarfs the original cost of the screws.

The difference between a secure bathroom installation and a failing one almost always comes down to two decisions: the right screw material for the moisture level, and the right fixing type for the wall substrate. This guide covers both in detail, with specific UK products, tested load ratings, and the drilling techniques that prevent cracked tiles and stripped threads.
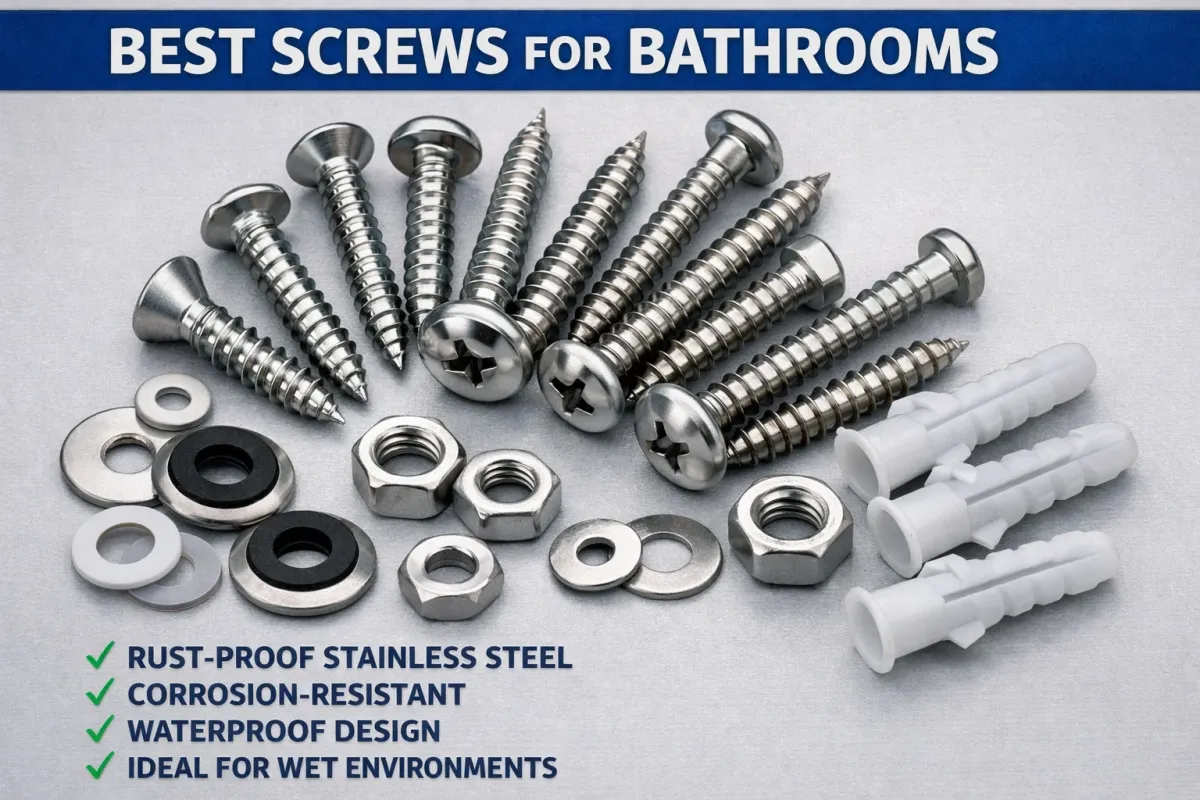
Screw Materials for Wet Environments
A2 Stainless Steel (Grade 304)
A2 stainless steel contains approximately 18 percent chromium and 8 percent nickel, forming a self-healing chromium oxide layer that resists corrosion even when scratched. This is the minimum acceptable grade for any bathroom screw. It handles general humidity, occasional water splash, and standard bathroom cleaning products without degrading.
Use A2 stainless steel for towel rails, toilet roll holders, mirror fixings, cabinet hinges, and any accessory that sits outside the direct shower zone. Timco Classic Multi-Purpose screws in A2 stainless steel and Spax stainless steel woodscrews are both widely stocked at Screwfix and Toolstation across the UK.
A4 Stainless Steel (Grade 316)
A4 adds molybdenum to the alloy, significantly improving resistance to pitting and crevice corrosion in chloride environments. This is the grade to specify for shower enclosure fixings, wet room installations, any fitting in constant water contact, and commercial bathrooms where heavy-duty chemical cleaning is routine.
The cost premium over A2 is typically two to three times, but in a shower zone or wet room that premium eliminates the risk of corrosion-related failure entirely. Timco Timber Frame screws in A4 stainless steel are available in lengths suitable for bathroom framework installations.
Brass Screws
Brass offers excellent corrosion resistance and a warm finish that suits traditional and heritage bathroom designs. It is the standard material for toilet pan-to-floor bolts, cistern internals, and tap mounting nuts. The limitation is strength. Brass is a soft metal, unsuitable for heavy-duty structural fixings. Always drill pilot holes to prevent the head stripping, particularly in hardwood or dense substrates.
Why Zinc-Plated Screws Fail in Bathrooms
Zinc-plated screws are the cheapest option on the shelf, and they are a false economy in any room with moisture. The electroplated zinc coating is thin and intended for dry indoor use only. In sustained bathroom humidity, “white rust” develops within weeks. In direct water contact, the base steel corrodes and leaves permanent orange staining in grout joints and on tile surfaces. The cost premium for A2 stainless steel over zinc-plated is negligible per screw. There is no reason to use zinc-plated screws in a bathroom.
Wall Plugs and Fixings by Substrate
The screw material handles corrosion. The wall plug handles load. Choosing the wrong plug for your wall type is the single most common cause of bathroom fixtures pulling away from the wall, and it happens because people assume all walls are the same.
Solid Masonry Walls (Brick, Block, Concrete)
Standard nylon wall plugs work reliably in solid masonry. The UK colour-coded sizing system applies across most manufacturers.
| Plug Size | Colour | Screw Size | Drill Bit | Typical Load |
|---|---|---|---|---|
| 5mm | Yellow | No. 4–6 | 5mm | Up to 10kg |
| 6mm | Red | No. 6–8 | 6mm | Up to 20kg |
| 7mm | Brown | No. 10–14 | 7mm | Up to 30kg |
| 8mm | Brown/Grey | No. 14 | 8mm | Up to 40kg |
| 10mm | Blue | No. 14–16 | 10mm | 50kg+ |
For heavier items such as vanity units and heated towel radiators, coach screws with hex heads provide greater clamping force than standard screwdriver-driven fixings. Always use a washer between the coach screw head and the bracket to spread the load and prevent the metalwork grinding.
Fischer DuoPower universal plugs deserve a specific mention. These two-component nylon plugs automatically adjust their behaviour depending on the substrate, expanding in solid materials and folding into a knot in hollow sections. A 10x50mm DuoPower in concrete supports up to 215kg in tension. In solid brick, the same plug holds 120kg. For unknown wall types or mixed substrates, DuoPower is the safest starting point.
Plasterboard and Stud Walls
Standard nylon wall plugs do not work in plasterboard. They spin, pull through, and take your fixture with them. Plasterboard requires specialist fixings that grip behind the board or spread load across a wider area.
GripIt fixings are a UK-designed solution with wings that open behind the plasterboard to distribute load. The range runs from the Yellow (71kg capacity) through Red (74kg), Brown (93kg), and Blue (113kg) to the Rhinofix at 150kg. For bathroom cabinets and shelving, the Red or Brown GripIt is typically sufficient. For heated towel radiators, the Brown or Blue provides the necessary margin.
Toggler SnapToggle fixings offer an alternative approach, using a metal toggle bar that flips open inside the cavity. They hold over 108kg in standard 12.5mm plasterboard and install through a 13mm hole in under ten seconds. Unlike some plasterboard fixings, SnapToggles are reusable. You can remove the screw and reinstall without losing the anchor.
For heavy items on plasterboard walls in bathrooms, consider whether the load genuinely needs to go into the plasterboard at all. If you can locate the timber studs behind the board using a detector, fixing directly into the stud with a long stainless steel screw provides a stronger and simpler solution than any plasterboard anchor.
Tiled Walls
Tiled walls combine two challenges. The tile itself is hard, brittle, and prone to cracking. The substrate behind it may be cement board, plasterboard, or masonry. Each requires different treatment. The general approach is to drill through the tile using a specialist tile bit on rotary mode, then switch to the appropriate masonry or wood bit for the substrate behind. Choose your wall plug based on the substrate, not the tile. For more on wall substrates, see our guide to cement boards in bathrooms.
Account for the combined thickness of tile and adhesive when selecting screw length. Ceramic tiles plus adhesive typically add 10 to 15mm. Porcelain tiles plus adhesive add 12 to 20mm. The wall plug must sit entirely within the structural wall behind, not bridging the tile and adhesive layer.

Load Ratings by Bathroom Fixture
Not all bathroom fixtures place the same demands on their fixings. A toilet roll holder barely registers on the scale. A wall-hung toilet frame must support 400kg. The table below gives the approximate loads and recommended fixing approaches for common bathroom items.
| Fixture | Approximate Load | Recommended Fixing |
|---|---|---|
| Toilet roll holder | 1–2kg | 6mm plug + A2 screw |
| Soap dish or dispenser | 1–3kg | 6mm plug + A2 screw |
| Towel ring | 2–5kg | 6mm plug + A2 screw |
| Bathroom mirror | 5–15kg | 8mm plug or GripIt Yellow |
| Towel rail (loaded with towels) | 10–20kg | 8mm plugs or spring toggles |
| Bathroom cabinet | 15–30kg | 8–10mm plugs or GripIt Red |
| Heated towel radiator (filled) | 20–50kg | Coach screws + 10mm plugs, or GripIt Brown |
| Wall-hung basin (in use) | 30–80kg | Resin anchors or frame to masonry |
| Grab rail | Tested to 150kg | Through-fixed to masonry or timber (BS 8300) |
| Wall-hung toilet + user | Up to 400kg | Steel frame (Geberit Duofix or Grohe Rapid SL) |
Grab rails installed under BS 8300 (the standard for accessible buildings) must be through-fixed to structural elements. A grab rail on plasterboard, even with heavy-duty fixings, is dangerous. During a bathroom renovation, the ideal approach is to install timber noggings between the studs at grab rail height before the walls are boarded and tiled. This gives you a solid structural fixing point that supports the 150kg test load.
Wall-hung toilets are in a category of their own. The dedicated steel frames from Geberit (Duofix) and Grohe (Rapid SL) are engineered to support over 400kg, certified under BS EN 997. The wall itself often limits capacity more than the frame. Solid masonry is ideal. Stud walls need additional reinforcement or a self-supporting frame version. This is not a job for improvised fixings.
Drilling into Bathroom Tiles
Drilling into tiles is the step that causes the most anxiety, and for good reason. A cracked tile in the middle of a tiled wall means stripping and replacing. Getting it right depends on the tile type, the drill bit, and the technique.
Ceramic Tiles
Ceramic wall tiles are relatively soft (Mohs hardness 5 to 6). A carbide-tipped tile drill bit handles them comfortably at low speed. Set the drill to rotary mode only. Never use hammer or impact action on any tile. Mark the drilling point, apply masking tape over the area to prevent the bit wandering on the glaze, and drill at 400 to 800 RPM with light, steady pressure. The bit does the cutting. Forcing it generates heat that cracks the tile.
Porcelain Tiles
Porcelain is significantly harder than ceramic (Mohs hardness 7 to 8) and requires a diamond-tipped drill bit. Carbide bits will not cut it. Start at an angle to the tile surface to establish a groove, then bring the drill vertical. Keep the speed below 2,500 RPM and cool the bit continuously with water from a spray bottle or a damp sponge held against the drilling point.
The Marcrist PG750X is widely regarded as the fastest dry porcelain drill bit on the UK market, lasting 60 to 100 holes in the hardest porcelain thanks to a built-in wax coolant system. The Bosch Easy Dry Diamond range uses a similar wax insert approach and is stocked at most UK tool retailers. For professional bathroom tiling work, Armeg and Rubi also produce reliable diamond-tipped ranges.
The Two-Stage Approach
Once through the tile, stop. Switch from the tile bit to a masonry drill bit sized for your wall plug. Re-engage hammer action for the masonry substrate. Drill to the required depth, insert the wall plug, and drive the screw. After installation, seal around the penetration with bathroom-grade silicone to prevent moisture from tracking behind the tile and into the substrate. This step is particularly important in shower areas and above baths where water runs down the wall.
Drilling into PVC Bathroom Panels
Bathroom wall panels from brands like Multipanel and Nuance are grout-free alternatives to tiles, and they require a different drilling approach. PVC is softer than ceramic but will crack or melt if handled incorrectly.
Create a pilot hole first using a drill bit slightly smaller than the final screw diameter. Use rotary mode at low speed. PVC generates heat through friction, and excessive speed will melt the material around the hole, leaving a ragged edge and a weak fixing point. Support the panel from behind with a piece of scrap timber to prevent blow-out on the reverse side.
Self-tapping screws designed for plastic materials provide the most secure fixing in PVC panels. Avoid over-tightening, which distorts the panel surface. For heavier items mounted through panels, the fixing should go through the panel and into the structural wall behind, with the panel acting as a spacer rather than bearing the load.
Common Fixing Mistakes
Using the wrong plug for the wall type. This is the most frequent cause of bathroom fixture failure. Standard nylon plugs in plasterboard will pull out under almost any meaningful load. Plasterboard fixings in solid masonry are unnecessary and less effective than a correctly sized nylon plug. Before drilling, identify your wall type: tap it (hollow sound means stud wall), use a detector, or drill a small pilot hole to see what comes out.
Zinc-plated screws in wet areas. The thin zinc coating fails in sustained humidity. Brown rust stains bleed into grout and onto tile surfaces, often permanently. Use A2 stainless steel as the minimum in all bathroom areas and A4 in shower enclosures and wet rooms.
Over-tightening into tiles. Once the screw is snug against the fixture, stop. Excessive torque stresses the tile surface and causes hairline cracks that may not appear immediately but propagate over time. A rubber or nylon washer between the fixture and the tile distributes pressure and reduces the risk.
Not checking for pipes and cables. Bathrooms contain concentrated runs of water pipes, waste pipes, and electrical cables. Use a multifunction detector before drilling. Cables typically run vertically or horizontally from sockets and switches. Avoid drilling directly above, below, or beside existing fittings. In older properties, cable routes may not follow safe zones. A detector is essential, not optional.
Using hammer drill on tiles. Impact action cracks tiles instantly. Always drill through the tile on rotary mode, then switch to hammer action only after the bit passes into the masonry substrate behind.
Inadequate fixings for heavy items. A wall-hung basin weighing 30kg empty and 80kg in use cannot be supported by wall plugs in plasterboard. Grab rails must be through-fixed to structural elements. A failed grab rail or basin mounting is a serious safety hazard, not just an inconvenience. For professional installation of heavy bathroom fixtures, correct structural fixings are non-negotiable.
Fixing Types at a Glance
| Fixing Type | Best For | Wall Type | Max Load | UK Brands |
|---|---|---|---|---|
| Nylon wall plug + A2 screw | Light to medium accessories | Solid masonry | 50kg+ (10mm plug) | Fischer DuoPower, Rawlplug Uno |
| GripIt | Medium to heavy fixtures | Plasterboard | 71–150kg | GripIt (UK-made) |
| Toggler SnapToggle | Medium to heavy fixtures | Plasterboard | 108kg+ | Toggler |
| Coach screw + washer | Vanity units, radiators | Masonry (with plug) | 80kg+ | Timco, Spax |
| Resin anchor | Wall-hung basins, heavy cabinets | Masonry | 200kg+ | Hilti HIT-HY, Fischer FIS, Rawlplug R-KEM |
| Steel frame system | Wall-hung toilets | Masonry or reinforced stud | 400kg | Geberit Duofix, Grohe Rapid SL |
| Self-tapping A2 screw | PVC panels, plastic fixtures | Panel + substrate behind | Varies by substrate | Timco, Spax |
Choosing the Right Fixings for Your Project
For straightforward accessory mounting on solid walls, the combination of Fischer DuoPower plugs and A2 stainless steel screws covers the vast majority of bathroom installations. For plasterboard walls, GripIt or Toggler SnapToggle fixings handle everything from mirrors to radiators. For heavy-duty items like wall-hung sanitaryware, resin anchors or dedicated frame systems are the only responsible options.
If you are planning a bathroom renovation and want to avoid fixings problems entirely, the best approach is to have timber noggings installed at accessory and grab rail positions during the first-fix stage, before the walls are boarded and tiled. This gives you solid timber to screw into at exactly the positions you need, regardless of wall type. Our guide to essential bathroom tools covers the basic equipment for homeowners tackling simple installations, while our professional tools guide covers the specialist fixings kits that tradespeople carry.
For anything beyond light accessory mounting, or for any installation on plasterboard where you are unsure of the wall construction, a professional bathroom fitter will identify the substrate, select the correct fixings, and install them to the load ratings your fixtures require. Getting the fixings right at installation prevents the far greater cost of fixing them later.
Frequently Asked Questions
What grade of stainless steel should I use for bathroom screws?
How do I fix heavy items to a plasterboard bathroom wall?
Can I drill into porcelain bathroom tiles without cracking them?
How much weight can a wall-hung toilet support?
What wall plugs should I use if I do not know my wall type?
Should I seal around screws after drilling into bathroom tiles?
Why do my bathroom screws keep rusting?
Past Projects


Get a Free Quote
Book a free, no-obligation site survey. Call us on +44 7428 653 653 or request a callback.
Book Free SurveyOur Clients' Reviews

5/5

5/5

5/5

5/5
Based on 453+ verified reviews across all platforms
Related Articles
How Much Does a New Bathroom Cost in 2026? UK Pricing Guide
What a New Bathroom Really Costs in 2026 The question every homeowner asks before a bathroom renovation is the same. How much?
view this article Read more
Bathroom Renovation Guide: Every Stage From Start to Finish
What a Bathroom Renovation Actually Involves A complete bathroom renovation is one of the most rewarding home improvement projects you can undertake, but it is also one of the most misunderstood.
view this article Read more
Bathroom Tiling Styles for Timeless Elegance
Why Layout Matters More Than the Tile Itself A bathroom tile is a raw ingredient. The layout pattern is the recipe.
view this article Read more
Quartz, Granite or Porcelain Worktops: Which Suits Your Kitchen?
The Three-Way Decision Most Kitchen Renovations Come Down To Once you have decided that laminate is not enough and solid wood is not right for your cooking habits, the conversation narrows quickly.
view this article Read more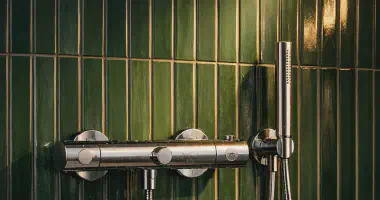
Ceramic Disc Technology in Bathroom Taps: How It Works
The Technology Inside Almost Every Modern Tap If your bathroom taps turn with a smooth quarter-turn rather than two and a half rotations, they contain ceramic disc cartridges.
view this article Read more
Fitting Kitchen Worktops: The Complete Installation Guide
From Order to Fitted The worktop is one of the last things fitted in a kitchen renovation and one of the first things to go wrong if the process is rushed.
view this article Read more
How to Choose an Electrical Bathroom Mirror
What an Electrical Bathroom Mirror Actually Does An electrical bathroom mirror is a permanently wired fixture that combines a mirror with integrated LED lighting, and often a demister pad, Bluetooth speakers, a shaver socket, or adjustable colour temperature.
view this article Read more
Best Bathroom and Toilet Brands in the UK
What Makes a Good Bathroom Brand The brand name on your toilet, basin or shower valve determines far more than the price tag.
view this article Read more
Bathroom Underfloor Heating: Types, Installation and What to Expect
Why Underfloor Heating Works So Well in Bathrooms Stepping onto a warm bathroom floor on a cold January morning is one of those small luxuries that, once experienced, becomes very difficult to give up.
view this article Read more
Tools Required for Bathroom Fitting: The Professional Trade Toolkit
The Professional Bathroom Fitter’s Complete Toolkit Every professional bathroom fitter knows that quality tools are an investment, not an expense. The difference between a flawless installation and a problematic one often comes down to having the right equipment for the job.
view this article Read more
What You Need to Know Before Your Kitchen Renovation
The Gap Between Expectation and Reality A kitchen renovation is not a weekend project. The 2025 Houzz UK Kitchen Trends Study found that 71 percent of homeowners change their kitchen layout during a renovation, and the median spend rose 34 percent year on year to £17,500.
view this article Read more
Accessible Bathroom Design: UK Regulations, Grants and Guide
Why Accessible Bathroom Design Matters Around 16.8 million people in the United Kingdom have a disability. That is one in four of the population, according to the DWP Family Resources Survey 2023/24, and the figure has risen by 4.
view this article Read more